Content and design must go hand in hand for a successful digital signage strategy. We’ve been talking quite a lot about the importance of having good and engaging content. Besides that, we always say that design matters. Not only design catches the attention of passers-by, but it also gives your viewers more reasons to keep looking at the screen.
That’s why we’ve implemented another great feature in our platform: Layer Zones on Campaign Layouts. This enables you to create more visually appealing content and add transparent layers to your campaigns. We’ve always offered you the option to choose from existing campaign layouts or to create them yourself. However, you weren’t allowed to overlap 2 screen divisions by any means when adding a custom layout.
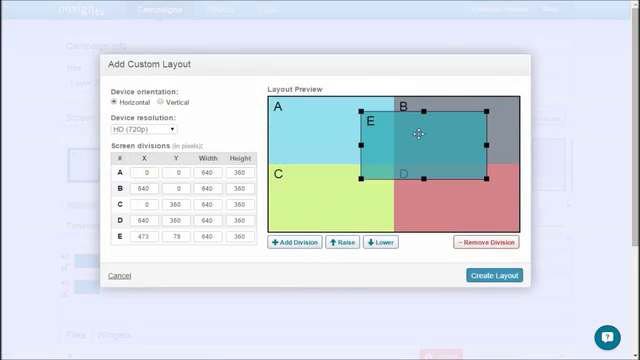
Now you’re able to draw up to 10 divisions and put them on top of each other. For example, you can reserve a space in your background image to be filled with components and resources that are going to be positioned in layers above. If you want so, it’s also possible for you to use transparent png files as frames to your campaigns. Take a look on how to do that at our platform:
As you can see, you just have to click Create Campaign and then Add Custom Layout. If you click + Add Division, a new zone will be positioned above the existing one. You may also change the layering order of each division by raising or lowering them and change divisions’ height and width in your Layout Preview. Don’t forget to check your device orientation and resolution. Click Create Layout and that’s it! Pretty easy, huh? Note that the first division on your timeline list is always going to be the lowest on the screen.
Retail companies, for instance, can now merchandise products on a backdrop layer that changes periodically. Your company can also take advantage of this feature by using layer zones for easy branding, for example. Some picture file formats — such as PNG — are suitable for creating transparent layers, which allows you to superimpose your logo or add temporary messages on top of any other file without disturbing the background content too much.
Do you realize how much this new feature gives you freedom to design your message to have a bigger impact? We’ve mentioned just a couple of examples on how to use it, but there’s much more you can do! The feature is almost an invitation for you to show your digital signage messages in different ways. Don’t you agree? Now it’s up to you to go creative and see how your digital signage design can boost your business performance.


